If you want to be sure that well-behaved verified bots like GoogleBot can bypass your age gate you will need to create a Cloudflare HTTP Request Header Transform Rule for the plugin to detect. You can do this with any Cloudflare account, including the free plan.
As of version 2.5.7 the XYZ Age Verification plugin now allows you to control if verified bots are allowed to bypass the age-gate page using a Allow Verified Bots setting in the admin area. If you want verified bots to be able to access your content you need to follow the instructions in this article. If you want bots to be blocked like regular users then you do not need to follow these instructions. If you do choose to set the Verified-Bot header you can use the new admin setting to enable/disable verified bot access to your pages.
As of version 2.6.0 there is a new option in the admin settings to generate a Verified Bot token. This is a hardening option. With the Verified Bot token there are two ways to configure if verified search engine bots are allowed to bypass the age gate: Basic Configuration and Strong.
Basic configuration
- Go to Rules → Overview.
- In the Request Header Transform Rules section, click Create Rule.
- Give the rule a name (e.g.,
add verified bot header).
- Select Custom filter expression and click Edit expression (the
cf.client.bot field is not available in the Expression Builder presets).
- Enter the expression:
(cf.client.bot)
- Under Then, set the value-type dropdown (the leftmost selector on the "Modify request header" row) to Set dynamic. This tells Cloudflare to evaluate the Value field as an expression rather than treat it as a literal string.
- Set the header:
- Header name:
verified-bot
- Value:
cf.client.bot (this expression evaluates to the literal string true)
- Set Place at: First.
- Click Save.
The plugin's Verified-Bot Token setting defaults to true to match this configuration. No further action required.
Strong configuration (recommended for compliance-sensitive sites)
This variant replaces the literal true value with a per-site secret. An attacker who reaches your origin server directly (e.g., bypassing Cloudflare via your origin IP) cannot use the bot-bypass without knowing this secret.
- In the WordPress admin, go to Settings → XYZ Age Verification.
- Next to the Verified-Bot Token field, click Generate. Copy the resulting hex string.
- Save the plugin settings.
- In the Cloudflare dashboard, follow steps 1-5 of the Basic configuration above.
- Under Then, set the value-type dropdown (the leftmost selector on the "Modify request header" row) to Set static. This is the critical difference from the Basic configuration, which uses Set dynamic. The strong configuration must use Set static because the Value is a literal token string, not an expression for Cloudflare to evaluate. If you leave the dropdown at Set dynamic, Cloudflare will refuse to save the rule and return a "Filter parsing error" pointing at your token (e.g.
'4253cc65...' is not a valid value for expression ... unknown identifier). This is a deliberate guard rail — you'll see the problem immediately rather than after verified bots start getting gated.
- Set the header:
- Header name:
verified-bot
- Value: paste the hex string you generated in step 2.
- Set Place at: First.
- Click Save.
The two values must match exactly. If you rotate the token in the plugin, you must also update the Cloudflare rule's Value field; otherwise verified bots will be redirected to the age gate.
In your Cloudflare account, navigate to your domain name. On the left menu look for Rules -> Overview. In the right pane a list of all of the rules configured for your domain will appear. Look for the Request Header Transform Rules section and click the Create Rule link.
When you are on the Create new HTTP Request Header Transform Rule page you will need to click the Edit Expression link. (The cf.client.bot value is not available in the Expression Builder mode presets.)
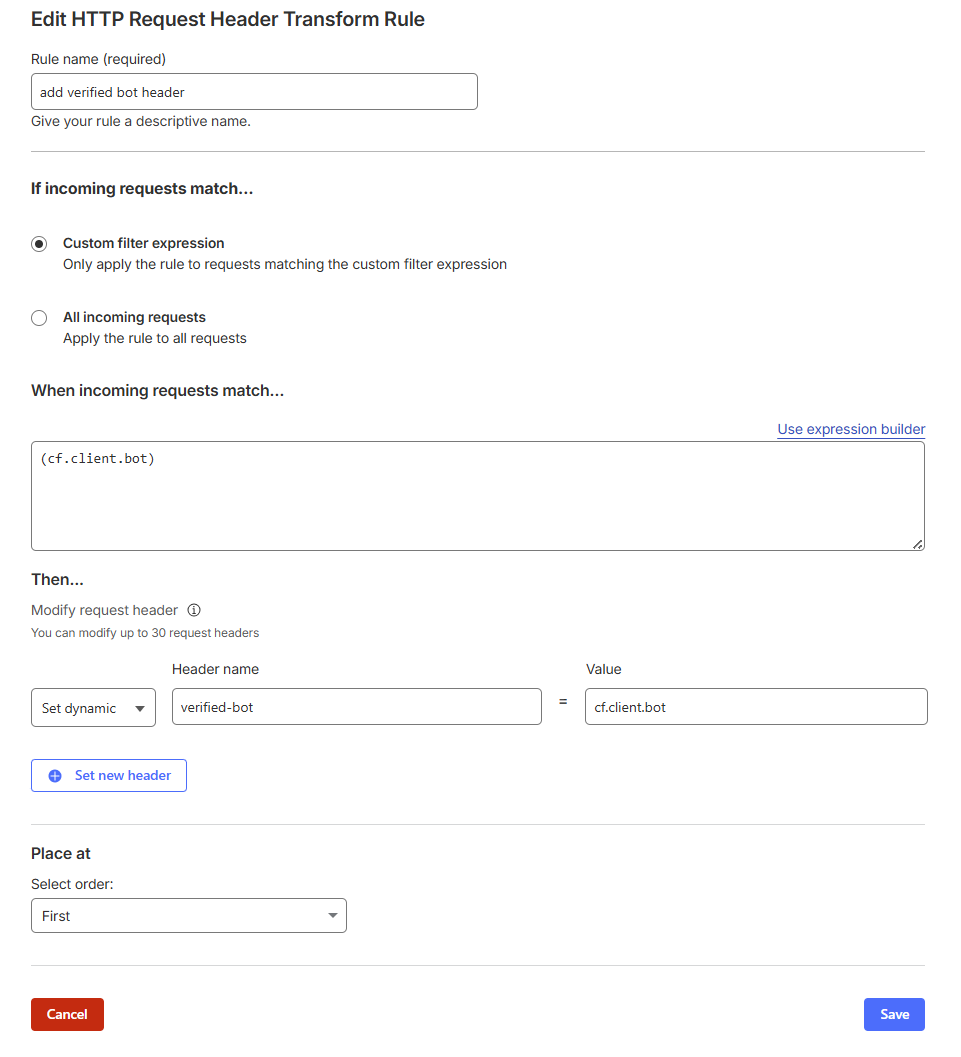
Give the rule a descriptive name. Select the Custom filter expression radio if it is not already selected. In the expression editor enter (cf.client.bot). Then you need to set a dynamic header named "verified-bot" with a value of "cf.client.bot".
If you add it as the first transform rule it will ensure no other rules bypass setting this header.
The transform rule you are creating should look like this.
Restricting Origin Access to Cloudflare (Recommended)
Cloudflare can only enforce age verification (and any other security policy) on requests that actually go through it. If an attacker discovers your origin server's IP address, they can connect to it directly and replay any request as if it had come through Cloudflare — including the bot-bypass header and any region-spoofing payload they choose. The standard technique uses curl --resolve to send a TCP connection to the origin IP while presenting the correct SNI, Host header, and TLS hostname to the server, so the request looks indistinguishable from a legitimate one except for its source IP. Most web servers happily serve their configured vhost when this happens.
Origin IPs are easier to find than operators usually expect. Common leakage vectors include historical DNS records archived by services like SecurityTrails and DNSlytics; unproxied subdomains (mail., cpanel., direct., dev.) revealed by certificate transparency logs; SMTP Received: headers in outbound email from the WordPress server; SPF/MX records; and internet-wide scans by Censys and Shodan that index every public HTTPS certificate's SAN list. A site that has been on Cloudflare for years with disciplined subdomain hygiene is harder to find; a site freshly migrated is often trivial.
The most accessible defense is to configure your origin (or its upstream firewall) to only accept HTTP/HTTPS connections from Cloudflare's published IP ranges. The list is at cloudflare.com/ips and changes occasionally — set a calendar reminder to review it quarterly, or use a managed integration if your provider offers one.
How you implement the allow-list depends on where your site is hosted:
- Shared hosting (cPanel, Plesk, etc.): look for an "IP Deny Manager" or "IP Access" tool. Some shared hosts will not let you restrict by IP because the server IP is shared with other customers. If yours doesn't, fall back to the
.htaccess option below.
- VPS or dedicated server (AWS, DigitalOcean, Linode, Hetzner, etc.): use your cloud provider's firewall (AWS Security Groups, DigitalOcean Cloud Firewalls,
ufw on Ubuntu) to allow ports 80 and 443 only from Cloudflare's IP ranges. Block everything else. This is the cleanest implementation because it stops connections before they reach the web server.
.htaccess (Apache, any host): add Cloudflare's ranges as Require ip directives. Enforced inside Apache, so it's a touch less robust than a network-layer firewall but easy to deploy on shared hosting.- nginx: use
allow and deny directives in your server block.
If you cannot restrict origin access at all (some shared hosts make this impossible), the strong configuration of the Verified Bot Header Rule above is the next-best defense — even a direct-to-origin attacker cannot use the documented bot-bypass path without knowing the per-site token, which is stored only in your WordPress database and your Cloudflare account.
Stronger alternative: Authenticated Origin Pulls (advanced)
For operators comfortable managing TLS certificates on their server, Cloudflare's Authenticated Origin Pulls is a stronger defense than IP allow-listing. Instead of trusting the source IP of incoming connections, your origin requires every TLS handshake to present a client certificate issued by Cloudflare. Forging this is not practical, so attackers cannot reach the origin even if they know the IP and even if Cloudflare's IP ranges change.
Why this is more involved than IP allow-listing:
- You need shell access to the origin and the ability to edit your web server's TLS configuration.
- You must download Cloudflare's Authenticated Origin Pulls CA certificate, install it on the origin, and add directives that require client certificate verification on every TLS handshake (
ssl_client_certificate + ssl_verify_client on in nginx; SSLCACertificateFile + SSLVerifyClient require in Apache).
- A misconfiguration produces TLS handshake errors that look like generic outages, which can be hard to diagnose if you're new to client-cert authentication.
The Cloudflare documentation has step-by-step instructions and the default CA download — search Cloudflare's docs for "Authenticated Origin Pulls." This is available on the Cloudflare Free plan when using their default (shared) CA. Per-hostname certificates are a paid feature but not required for the protection benefit.
Authenticated Origin Pulls and IP allow-listing are complementary, not alternatives. The strongest configuration is both — IP allow-listing stops obvious noise at the network layer, and Authenticated Origin Pulls protects against future IP-list changes and any IP-discovery technique an attacker comes up with. But either one alone is a meaningful improvement over an exposed origin, and IP allow-listing is the realistic starting point for most operators.